Home Page Hard Times Survival Hard Times Recipes Gourmet Recipes Gardening Tips Firearm Facts Economy Book Reviews
Wilderness Survival Christian Poems Bible & Prophecy Bible Truths Other Information Children Stories Product Links Search Website My Books

Grandpappy's Hash Browns

Copyright © January 1, 2018 by Robert Wayne Atkins, P.E.
All Rights Reserved.


The following Gourmet Recipe is included in my book: Grandpappy's Gourmet Cookbook.

Introduction

In 1974 I made my first batch of homemade hash browns by shredding raw potatoes. They were absolutely disgusting and I put them in the trash can after just one bite. I knew exactly what hash browns should taste like because I had eaten hash browns many times at a restaurant even though my mother never fixed them for us when we were growing up. (Note: I also really enjoyed eating tacos at a restaurant even though we never had tacos when I was growing up in the 1950s and 1960s.)

The reason I was motivated to cook my own homemade hash browns in 1974 was because my parents raised us without regard to whether we were male or female. All of us had to learn how to wash dishes by hand, how to use the laundry machine, how to hang clothes on a clothesline to dry, how to iron clothes, how to fold clothes, how to make beds, how to sweep the floor, and how to cook simple meals. We also had to learn how to plant a garden, how to mow the yard, how to safely shoot a firearm and a bow and arrow, how to fish, how to use basic hand tools, and how to change a flat tire on a car. My parents believed that all of their children needed to learn how to do almost everything so we could live happy lives without rushing into a marriage, and when we did marry that we would do so for the right reasons and not because we needed someone to do the things we didn't know how to do ourselves.

It is because of my mother that I have always been interested in cooking. I am referring to cooking from scratch and not simply opening a can of food or thawing out frozen food. Over the course of my life I have slowly and gradually enhanced my cooking skills. My scientific engineering background has enabled me to understand the chemical and scientific reasons why some things should be done and why other things should not be done.

After 43 years my quest for almost perfect homemade hash browns ended on December 31, 2017 (New Year's Eve). I prepared four batches of hash browns and each time I made very minor modifications to my basic recipe, and then I allowed my family to tell me which batch they liked best and why. The recipe instructions that appear below are based on my family's first choice of the best of my four batches of hash browns.

Spatula Turner 
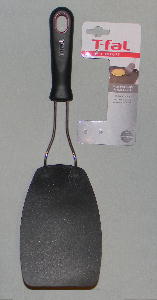
One of the utensils that is almost indispensable for cooking hash browns is a large "spatula turner" with a long flexible flat solid plastic end that measures 6 inches by 4 inches. It is just the right size to get completely under a layer of hash browns in a skillet so they can be turned over without some of the hash browns falling off the spatula. Because the end is a little bit flexible it can be used near the outside edge of a skillet and pressed down so the leading edge bends and slides under the item that needs to be flipped. This type of spatula is also extremely useful when making omelets, pancakes, or other items that can fall apart as they are being flipped over. The "spatula turner" in the picture on the right costs $5.97 at Walmart.
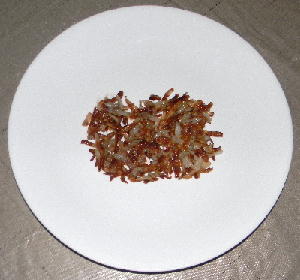
My recipe for hash browns is different from other recipes in the following ways:

Most hash brown recipes recommend preparing the potatoes using one of the following methods:
  1. Peeling and shredding the raw potatoes and squeezing out as much moisture as possible, and then frying them.
  2. Peeling and shredding the raw potatoes and soaking them in cold water, or in water that contains ice cubes, for ten minutes or for up to two hours, and then squeezing out as much water as possible, and then frying them.
  3. Peeling and shredding the raw potatoes and squeezing out as much moisture as possible, and then cooking them in a microwave on high for one or two minutes, and then frying them.
  4. Peeling and parboiling the potatoes for 10 to 12 minutes to cook out some of the starch, and allowing them to cool, and then shredding them and frying them.
The starch in the potatoes is what causes them to stick to the frying pan and therefore the starch should be extracted. The first method above does a poor job of removing the starch. The last two methods cook the potatoes, either in a microwave or in boiling water, and cooking softens the potatoes and removes some of the starch, but a lot of the starch still remains in the potatoes and softer potatoes do not make the best tasting crispy hash browns. The second method leeches out the starch using cold water, or ice water, and this is the best way to remove the starch. Cold water does not cook the potatoes and it is not easily absorbed into the potatoes like warm water or boiling water. Therefore cold water helps to remove the starch without adding water into the potatoes. Ice water is better than cold water but the pieces of ice floating in the water will make contact with the shredded potatoes and this can freeze small spots on the potatoes which is not good.

The method I recommend is to put a bowl of cold water, with a little salt added, into the freezer until a very, very thin layer of ice just begins to form against the inside edge of the bowl and/or on top of the water. Then put the shredded potatoes in the water and put the bowl of water in the refrigerator for between 30 to 60 minutes. This allows the water to retain most of its coldness without freezing some spots on the potatoes. It also extracts the starch without saturating the potatoes. Most of the starch will be extracted in about 30 minutes and this is easily verified by looking at the darker water in the bowl, and the pool of milky white starch in the very bottom of the bowl after removing the potatoes and most of the water. It also adds very little moisture to the potatoes and this is easily verified when the potatoes are squeezed inside a clean dish towel because the towel only gets a little bit moist. At 60 minutes the starch extraction process has slowed down to a crawl and soaking longer will not make a significant difference in the amount of starch remaining in the potatoes, but soaking longer will allow more moisture to be absorbed into the potatoes and it will gradually make them softer and this is undesirable for frying crispy hash browns. Most of this information is included in my recipe below but my recipe does not include as much detailed discussion as this paragraph.

The reason salt is added to the cold water before putting it in the freezer is because salt water is "denser" than unsalted water and therefore the water is not as easily absorbed into the potatoes while they are soaking but it still does a great job of leeching the starch out of the potatoes. Salt also lowers the freezing temperature of the water just a little so the water will be colder but not frozen when the potatoes are added. This is one of the reasons salt is tossed onto icy roads, driveways, and sidewalks because it "melts" the ice by lowering the freezing temperature of the ice. In my recipe a little salt is also sprinkled on the potatoes immediately after they are put in the skillet and before they are fried.

I also recommend an additional step in the drying process. After squeezing the shredded potatoes in a clean dish towel, put the potatoes in a single layer on a piece of parchment paper on a baking pan and heat for 3 minutes in a preheated 250°F oven. This helps to dry the potatoes without cooking them because the oven temperature is too low and the time in the oven is too short. It is just long enough and just hot enough to drive off the excess moisture in the potatoes and this is very desirable for frying crispy hash browns.

If you follow the instructions in my hash browns recipe below then you may be pleasantly surprised in your ability to cook hash browns at home using raw potatoes instead of using frozen hash browns.


Grandpappy's Hash Browns Recipe, 4 Servings

2 cups potatoes, shredded2 cups ice cold water
8 teaspoons butter, for frying, 1 teaspoon at a time1/2 teaspoon iodized salt, plus salt for sprinkling

Hash Browns Spatula: A turning spatula with a soft flexible flat solid end that is 6 inches long and 4 inches wide is very useful for cooking hash browns. This type of spatula can be purchased for about $6 at Walmart.

Potatoes: Red skin potatoes or baking potatoes, such as Idaho or Russet, may be used. I personally prefer red skin potatoes for hash browns because they have a slightly better flavor after frying in butter. One medium red skin potato will yield about 1 cup of shredded potatoes. One large baking potato will yield about 2 cups of shredded potatoes.

Butter or Oil: Frying in a little butter will enhance the flavor of the hash browns, and butter will help to provide the desirable golden brown color that is associated with properly cooked crispy hash browns. However, if you prefer you may use canola oil instead.

Crispness: This recipe will create hash browns with a crispy top layer, and a crispy bottom layer, and a very thin inner layer of cooked potatoes that are not crispy. This yields the eating and chewing texture and flavor that most people enjoy. However, if you prefer all the hash browns to be crispy then use a little less potatoes per skillet or spread the potatoes in a thinner layer on the skillet.

Instructions: Put 2 cups of cold water in a large bowl, add 1/2 teaspoon salt, and stir. Put the bowl of water in the freezer for about 30 minutes, or until a very, very thin layer of ice just begins to form against the inside edge of the bowl, and/or on top of the water. Salt is added to the water to lower its freezing temperature just a little and to make the water "denser" so it does not easily saturate into the potatoes, but the water can still leech the starch out of the potatoes.

Rinse the whole potato under cold faucet water to remove any impurities. Dry the potato with a paper towel. Peel the potato and discard the peelings. Shred the potato using the largest holes in a grater (be very careful so you don't hurt yourself). One large baking potato will yield about 2 cups of shredded potatoes. Remove water from freezer, add shredded potatoes to the ice cold water, and stir gently. Put the bowl of potatoes in the refrigerator for 30 to 60 minutes. The ice cold water will extract most of the starch from the potatoes because the starch is what causes the potatoes to stick to the skillet. The potatoes will not absorb very much water because the water is so very cold. This yields potatoes that are very low in starch and with very little extra water. The potatoes need to soak in ice cold water for at least 30 minutes but no more than 60 minutes to avoid saturating the potatoes with water. If you have the time then 60 minutes is recommended. When you remove the potatoes from the water you will notice the water is darker and a small pool of milky white starch in the bottom of the bowl.

Rinse 1/2 cup of shredded potatoes in a strainer under cold tap water for about 12 seconds to rinse off the starch that is clinging to the outside of the potatoes. Then rinse another 1/2 cup of shredded potatoes, and so on. Rinsing in small batches helps to get more of the starch off the outside of the potatoes quicker with the use of less water.

Put a total of 1 cup of shredded potatoes lengthwise down the center on a clean dish towel. Roll the towel up around the potatoes and firmly twist both ends of the towel to help squeeze some of the water out of the potatoes and into the dish towel.

Put a piece of parchment paper, or nonstick aluminum foil, on a baking sheet. Put 1 cup of shredded potatoes on the parchment paper in one thin layer with a little space between the potatoes at random spots. Heat for 3 minutes in a preheated 250°F oven to help dry the potatoes for frying.

Put a large nonstick skillet with a gently curved outer edge over medium heat. Melt 1 teaspoon of butter (a thin slice) in the skillet and collect it into the center of the skillet with the end of your spatula. Spread 1/2 cup of shredded potatoes on top of the end of your spatula. Do not try to fry more than 1/2 cup in one stack or the stack will be too long or too wide to flip properly, or if the stack is the right size then it will be too thick for the potatoes in the center of the stack to cook properly. Allow the shredded potatoes to slide off the spatula into the butter in the middle of the skillet. Use the end of the spatula to form the potatoes into a long rectangle about 6 inches long and 4 inches wide (or the size of your spatula). Use the end of the spatula to gently level out the potatoes so they will cook evenly, especially in the middle. Do not press the potatoes firmly against the skillet. Sprinkle the top of the potatoes with a very small amount of fine grind sea salt. Fry for about 11 to 13 minutes over medium heat until the bottom side is a light golden brown. Do not stir or adjust the potatoes after they start frying -- just leave them alone. Medium heat, or just a little below medium, is recommended so the center of the hash browns will cook correctly and the bottom of the hash browns will brown lightly without burning. About 1 minute before you flip the potatoes, put 1 teaspoon of butter in the skillet near its outside edge so it will melt. Use the end of the spatula to slide the potatoes to one side of the skillet and then use the end of the spatula to slide the melted butter into the middle of the skillet. Slide the spatula under the potatoes and flip them over onto the new pool of melted butter. Gather any loose potatoes back with the rest of them, and if necessary, form into a 6 inch by 4 inch rectangle. Use the end of the spatula to gently level out the potatoes. Fry for about 8 to 11 minutes over medium heat, or until the other side is a light golden brown. If you flipped the potatoes just a little too soon then fry just a little longer on the other side to make sure the inside of the potatoes are done. When done tilt the skillet and allow the hash browns to slide over the edge of the skillet onto a plate. Serve immediately.


Grandpappy's e-mail address is: RobertWayneAtkins@hotmail.com

Home Page Gourmet Recipes