


Ten Different Ways to Heat Canned Foods
Copyright © September 1, 2010 by Robert Wayne Atkins, P.E.
All Rights Reserved.
It is possible to heat some food items while they are still in the can. This would mean no dirty cook pots to wash. However, after heating the can of food you will still need to transfer the food to a bowl or plate so you can stir the food to more evenly blend its ingredients in order to make it a more enjoyable eating experience.
If you decide to heat your food while it is still inside the can then you should first remove the exterior paper label, if the can has a paper label. Then you should remove the top of the can to allow the pressure to escape. Some people recommend simply punching one or two holes in the top of the can with a can opener in order to prevent the ashes from a campfire from getting into the food. However, trying to remove the lid from a can that has been heated to 120 degrees or higher can be a very challenging task.
Following are ten simple options for heating canned foods:
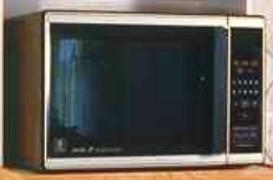
- Microwave Oven: If the power is still on a microwave oven will control the cooking aromas, and it uses very little power, and it is very fast. However, you must remove the food from the can and put it into a microwave safe container before heating the food inside the microwave oven.
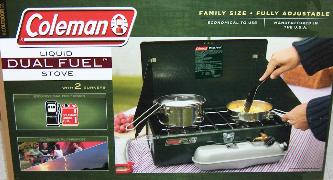
- Coleman Camp Stove: Another obvious option would be a Coleman Camp Stove. One model uses Coleman fuel and a different model uses the small propane tanks. The major shortcoming is the initial investment in the grill itself and in the fuel, and the fact that they are designed to be used outdoors because they release poisonous gas fumes while in operation. Another disadvantage is that when you run out of fuel the Coleman grill will cease to function. Finally, if you are forced to evacuate your home then which would you rather have in the trunk of your car: (1) a Coleman Grill and some spare fuel, or (2) an extra case or two of canned foods?
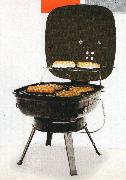
- Charcoal Grill: A small portable charcoal grill can be used to heat food. You should consider lining the bottom of the grill with a thin layer of sand, or dirt, or small gravel before starting a fire in the charcoal grill. You could use ordinary charcoal briquettes, or you could collect some small sticks from a nearby wooded area and use them to start a very small fire inside your charcoal grill.
If you use sticks, then you should consider collecting sticks that have fallen off the trees and are caught in some bushes or are leaning against something else. These sticks will be extremely dry and they will burn well. If you collect sticks lying flat on the ground then you will probably discover that many of them are damp, or moldy, or rotten and they will not burn well.
The primary shortcoming of both charcoal and sticks is that they must be used outside, and as they burn they will release an odor, or smoke, that will attract a lot of attention to your cooking area.
- Grill Surface: All you really need is the top metal grill cooking surface off a charcoal grill. You could support this metal grill piece in a variety of different ways and place a heat source below it to heat your food. For example, if you were indoors you could support the metal grill piece on top of four cans of food, and then put a can of "Sterno Cooking Fuel" below the metal grill piece, and you could then heat your food in a skillet on top of the metal grill piece. If you were outdoors you could use four rocks for support and start a fire using some wood sticks from a nearby wooded area.
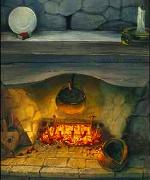
- Fireplace: If you have a wood burning fireplace then you could build a very small fire in your fireplace and heat your meals there. Remember that you only need to heat your food so it would be okay to heat the food over a small flame. In other words, you would not need to wait for the wood sticks to burn down into red hot coals to heat your food. This is one of the differences between simply heating a can of food and cooking from scratch. The major disadvantage of heating food in your fireplace will be the column of chimney smoke that everyone can see. During the cool or cold winter months this would not be an unusual sight. But during the warm summer months a column of chimney smoke will be a "very unusual sight" and almost everyone will notice it and immediately realize you are probably cooking something inside your fireplace.
- Solar Oven: You could purchase a pre-made solar oven, or you could build your own "solar oven." Or you could simply line the inside of a small cardboard box with some aluminum foil and then put a piece of glass or a piece of clear plastic on top of the box. The box should be at least twice as big as your can of food. Place the small solar oven in front of a southern facing window to heat your canned foods. The major shortcoming of this method is that the sun must be shining which may not be the case during a short-term hard times event.
- Window and a Dark Cloth: Do not remove the lid from the canned food, and do not punch any holes in the lid. Place the can of food under a dark cloth in front of a window in direct sunlight for several hours. You could also use this method by placing the wrapped can of food below the rear window of your car. The dark cloth will achieve two objectives: (1) It will collect and capture more of the sun's energy and do a better job of heating the food, and (2) It will prevent anyone who might pass by from seeing that you are heating a can of food underneath the dark cloth. The major shortcoming of this method is that the sun must be shining which may not be the case during a short-term hard times event.
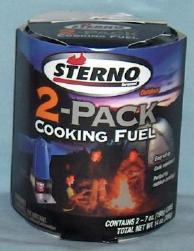
- Sterno Cooking Fuel: The twin packs of Sterno Cooking Fuel may be purchased in the camping section of most sporting goods stores, including most Walmarts. Remove the lid from the can, light the fuel, heat your food, put out the flame, put the top back on the can of fuel, and save the rest of the fuel for your next meal. Since you will only be heating your canned foods, a single can of Sterno Cooking Fuel will last a lot longer as compared to using it to cook a meal from scratch.
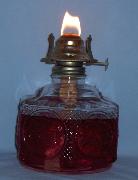
- Oil Lamp: Remove the glass top from the oil lamp, light the wick, adjust the wick to achieve a very short flame, and then put the flame below a campfire grill and heat the food on top of the campfire grill.
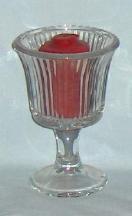
- Candle: Place a short round candle inside a candle holder and light it. The short round candles are better because they will last a lot longer inside a candle holder than a long thin candle that will burn down very quickly. You can heat your food above the flame of a candle similar to a "fondue" pot. The glass candle holder in the above picture has a long glass stem on its bottom. The long glass stem allows you to move the candle holder to a different location while the candle is still burning. Some candle holders have a flat bottom and the sides of the glass candle holder get extremely hot and it is very challenging to move the lit candle to a different location.
When you stop and think about the above options carefully, the ones that would be the most dependable in the widest variety of short-term hard times events and which would attract the least amount of attention would be the last four options above. On the other hand, if the power was still on, then the microwave oven would be my first choice.
Note: Several of the above options are only a reasonable choice for heating a can of precooked food. Cooking a food item from scratch will require significantly more heat for a much longer period of time.
Respectfully,
Grandpappy.
Grandpappy's e-mail address is: RobertWayneAtkins@hotmail.com