Home Page Hard Times Survival Hard Times Recipes Gourmet Recipes Gardening Tips Firearm Facts Economy Book Reviews
Wilderness Survival Christian Poems Bible & Prophecy Bible Truths Other Information Children Stories Product Links Search Website My Books

How to Make a Candle
Using Animal Fat and Some Cotton String

Copyright © August 1, 2016 by Robert Wayne Atkins, P.E.
All Rights Reserved.


Introduction

The advantages and disadvantages of candles, including a practical alternative to a candle, are discussed on my website here.

There are several different types of candles such as the following:

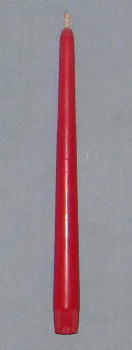
Long Candle
5" to 8" tall
0.9" to 1.2" round
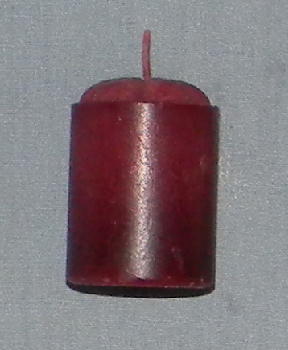
Short Candle
1.8" tall
1.4" round
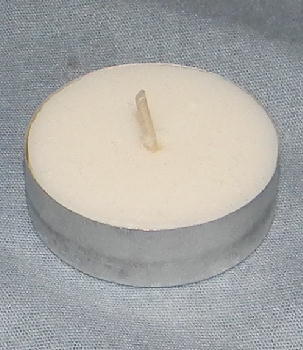
Tea Candle
0.5" tall
1.5" round
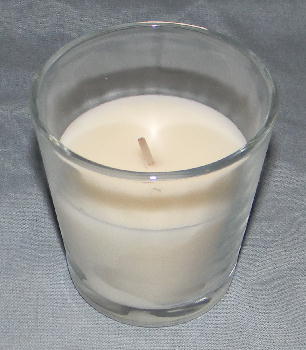
Jar Candle
3" tall jar
2.5" round jar

  1. Long Candles (tapered and plumber): These tall candles are designed to have their base inserted into some type of holder or candlestick. As the candle burns the molten wax runs down the sides of the candle and later the cold wax is usually discarded. This is not an efficient type of candle.

  2. Short Candles (votive): These short candles are designed to be burned on a fireproof surface or inside a short round jar that completely surrounds the candle. When burned in a glass jar the jar captures and contains the wax and feeds the molten wax back onto the candle flame until almost all the wax is eventually consumed. This is an efficient type of candle.

  3. Tea Candles (tealights): This is a very short round candle that is inside a disposable soft foil container. The container captures the wax and feeds the molten wax back onto the candle flame until almost all the wax is consumed. This is an efficient type of candle.

  4. Jar Candles: This is a candle inside some type of clear glass jar. The glass jar captures the wax and feeds the molten wax back onto the candle flame until almost all the wax is consumed. This is an efficient type of candle.

At the current time (August 1, 2016) most of the candle making instructions on the internet are for making long candles using candle molds, or using a process called "dipping." These long candles are not very efficient and they are relatively time consuming to make. Therefore I personally do not recommend these types of candles.

In my opinion a jar candle would be the most appropriate type of homemade candle for a hard times event. A jar candle only requires a short clear glass jar and some cotton string and some animal fat. A jar candle is relatively easy to make and it is very efficient because it collects and contains the molten animal fat and feeds it back onto the candle flame until almost all the animal fat is consumed. Therefore this article will describe the process I use to make homemade jar candles.


Candle Making Instructions

Glass Jars

Glass Jar Options
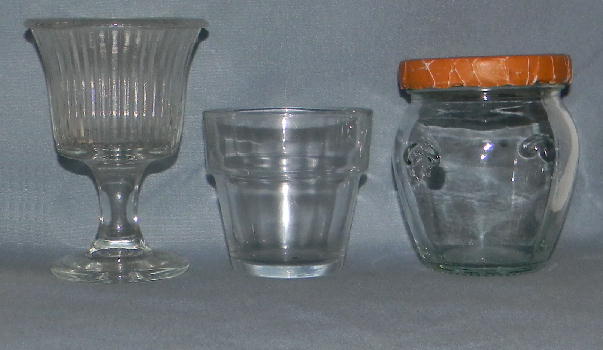
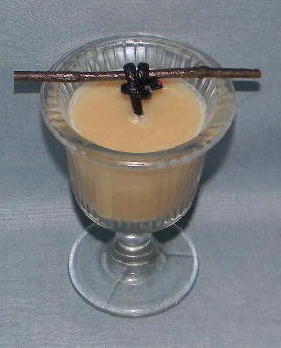
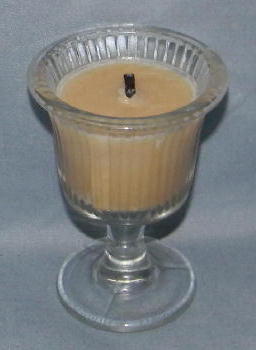
Votive Holder with Stem - - Votive Holder no Stem - - Jelly Jar with Lid

Glass Jars:
  1. Clear glass jars let the light radiate out into a room.
  2. A votive candle holder with a glass stem is an excellent choice because the glass stem remains cool while the candle is burning.
  3. A whiskey one-ounce shot glass, or a votive candle holder without a stem, is also acceptable.
  4. Very short jelly jars (3 inches tall or shorter) with a wide opening are better than tall jars with a narrow opening.

Cotton Wicks

Wicks Wick in Jar
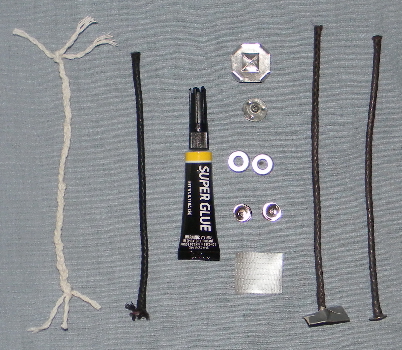
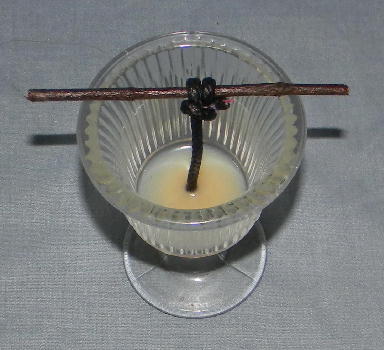
2 Wicks -- Super Glue -- Stabilizers -- 2 Examples Wick "Glued" to Bottom of Glass Jar Using Fat

Cotton Wicks:
  1. Wicks can be a cotton string, or cotton twine, or an old cotton shoelace, or a similar item that will burn. String and shoelaces made from some materials will melt and they will not catch fire and burn. Therefore test the string that you intend to use as a wick and verify that it will catch fire and burn evenly.
  2. Wicks should be thick. Thicker, heavier, more tightly compacted wicks are better than thinner, lighter-weight, loosely-woven wicks. If the string or shoelace material is thin then very tightly braid three stands together to make a thicker wick. (Note: Braiding instructions are at the end of this article.)
  3. Before attaching a stabilizer soak the wicks in melted animal fat to saturate the wicks with animal fat and then let the wicks cool.
  4. The above picture on the left shows three strands of cotton twine braided together. The next wick in the picture is a 5.5 inch (14 cm) long piece of cotton shoelace with its bottom 1/4 inch (0.6 cm) unbraided or frayed. On the right side of the tube of super glue there are examples of 5 different types of stabilizers. Stabilizers can be attached to the bottom of a wick to give the wick a little extra bottom weight and to hold the wick straight up when most of the wick has burned up and only a tiny piece of the wick remains. The top piece of metal came from the bottom of a votive candle. The next piece of metal came from the bottom of a tea candle. Then there are two metal washers with holes. Next are two metal thumbtacks. Finally there is a small square piece of duck tape. The two wicks on the right are examples of how a stabilizer can be attached to the bottom of a wick. The first example shows a piece of duck tape secured to the bottom of a shoelace wick that has had its bottom 1/4 inch (0.6 cm) frayed and the tape grasps the small frayed pieces all the way around the underside of the bottom of the wick and then the tape is folded over onto itself on two opposite sides of the wick. The second example shows a thumbtack pushed into the bottom of a shoelace wick. If you have a solid cotton shoelace then the thumbtack may stick well into the bottom center of the shoelace. If the thumbtack does not hold well to the bottom of the shoelace then you can put a very tiny drop of super glue on the point of the thumbtack and then push it into the shoelace and wait for it to dry. The metal piece from the votive candle (or the tea candle) can be crimped around the bottom of a wick with some pliers. A metal washer can be attached to the frayed end pieces of a wick with some super glue. Finally, if you do not have any type of stabilizer then you can simply put the frayed end of the bottom of the wick against the bottom of the glass jar and secure it into position with a very small amount of melted animal fat.
  5. As will be explained at the end of this article, you will probably need one extra wick so it is a good idea to make one extra wick and set it aside for later.
  6. The above picture on the right shows a cotton shoelace wick tied to a short wood stick and the stick is then positioned across the top of the glass jar so the wick hangs down in the middle of the jar. The important issue is to position the long piece of the wick in the approximate center of the glass jar so that later the wick will be surrounded by an equal amount of animal fat on all sides. This may require that the stick be placed a little off-center across the top of the jar so that the wick hands down in the center of the jar. A small amount of melted animal fat should then be transferred with a spoon into the glass jar in order to surround the bottom of the wick. Wait for the fat to harden in the bottom of the jar so that it can securely hold the bottom of the wick in position in the bottom center of the jar. Regardless of whether or not you have some type of stabilizer, always secure the bottom of the wick to the inside bottom of the jar with a little melted animal fat. After the animal fat had cooled then the above right picture was taken. The wick is now "glued" to the bottom center of the glass jar with animal fat.

Animal Fat

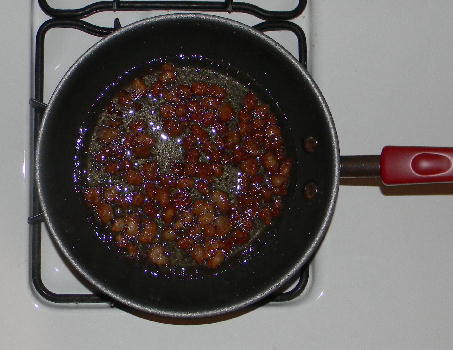
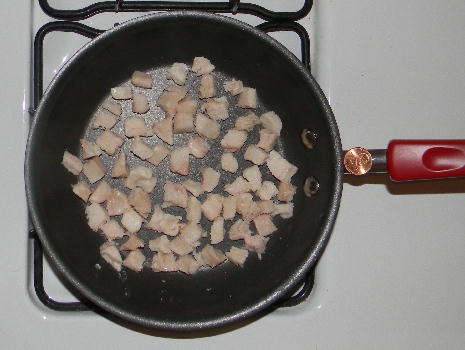
Raw Fat Cut into Small Pieces (See Copper Penny on Red Handle) Partially Melted Fat after One-Hour over Low Heat
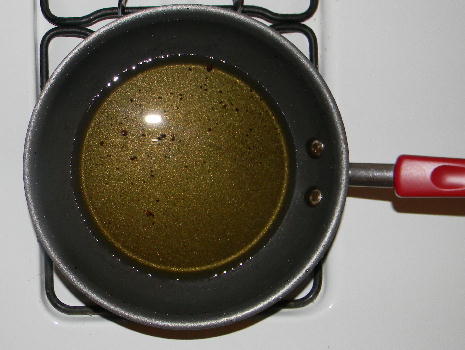
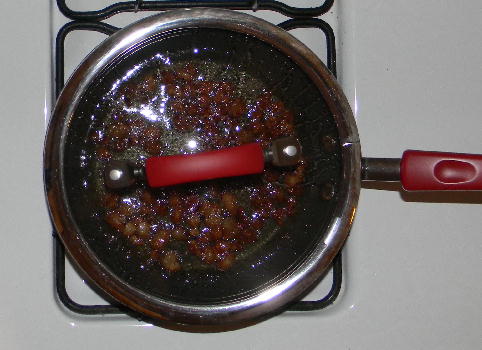
Glass Lid on Skillet to Prevent Splattering Melted Fat After Removing the Tiny Pieces of Unmelted Fat
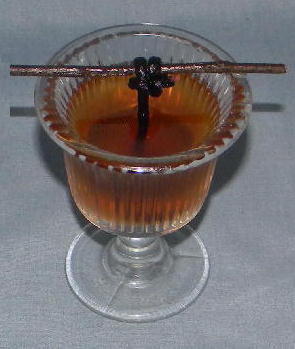
Note: The white spots in the above pictures are the reflection of my camera flash on the melted animal fat or the glass lid.

Animal Fat:
Note: Raw animal fat can quickly become rancid. Therefore raw animal fat should not be saved and then converted into grease at some future date. The best procedure is to melt animal fat into grease while the fat is still fresh. Melted animal fat has a much longer storage life than raw animal fat. If you have some animal fat and you cannot process it immediately then freeze it until you have the time to process the fat.

Types of Animal Fat:
  1. The best type of animal fat to use for making candles is a hard fat such as beef, sheep, or deer fat.
  2. Beef fat is called tallow and pig fat is called lard.
  3. The fat from farm animals, such as sheep or goats, may also be used.
  4. You may also use the fat from a variety of wild animals, such as beaver, opossum, raccoon, and groundhog.
  5. If there is any lean meat still attached to the fat then you must cut it off and make sure you only process the fat.
Melting the Animal Fat:
  1. Melting animal fat is called rendering.
  2. Rendering should be done outdoors or in a well ventilated area because the smell of melting animal fat can make some people nauseous.
  3. If possible use a pot or a skillet that has a lid cover. The lid will help to protect you and the top of your stove from the melting animal fat when the hot fat and grease occasionally pops and splatters. The lid will also keep the heat contained inside the pot so you will need less heat under the pot to melt the fat. Less heat under the pot will reduce the chance of burning the fat or the grease.
  4. Just barely cover the inside bottom of the pot with a little rainwater or distilled water. Do not put more than 1/8 inch (0.3 cm) of water in the bottom of the pot. The purpose of the water is to keep the fat from sticking to the pot and burning when you first begin to apply heat to the fat. The water will gradually evaporate as steam after you add heat to the pot.
  5. Cut the animal fat into small pieces about one-quarter inch cubed (or smaller) and put the fat into the pot so that you just barely cover the bottom of the pot in a single layer of animal fat. I recommend cutting the fat into very small cubes between 1/8 inch (0.3 cm) to 1/4 inch (0.6 cm) in size in order to reduce the total amount of time required to melt the fat into grease. (Note: Animal fat is easier to cut into small pieces if the animal fat is partially frozen.)
  6. Slowly add low to medium-low heat to the pot. I recommend the use of low heat because low heat minimizes the risk of burning the fat and ruining the grease.
  7. The animal fat will melt into a relatively clear or transparent grease when you first begin melting it. However, with the passage of time the grease will gradually become darker in color as the fat in the pot turns darker in color.
  8. After you have a shallow pool of melted fat in the bottom of the pot then you may gradually add more fat to the pot. Stir the mixture occasionally to keep the hot grease and solid pieces of fat circulating. As you stir be sure to scrape the bottom of the pot to prevent any fat from sticking to the bottom and burning.
  9. Do not burn the fat or allow it to smoke. If it starts to smoke then you are applying too much heat and you are burning the fat or the grease.
  10. It will usually take 3 or 4 hours, or longer, to melt the animal fat into grease depending on: (a) the type of animal fat, (b) the size of the pieces of animal fat, and (c) the amount of heat being used.
  11. One pound of fat will yield about 2.25 cups of grease. Most of the fat will melt into a liquid but some small solid particles will not melt and these are called cracklings. There may also be a few larger soft pieces of fat that will not melt. These soft pieces may be discarded or they may be used as you believe appropriate.
  12. After melting the fat, allow it to cool just a little, and then strain the melted fat through a clean thin cloth (or a clean paper towel). If you do not need the melted animal fat immediately then store it inside a sealed container until it is needed.
  13. The cracklings will be on the top surface of the straining cloth. If you wish you may save the cracklings for use in cooking recipes if the original fat was not contaminated in any way. The flavor of the cracklings will depend on the type of animal fat used and the heat at which it was melted. Some people enjoy the taste of the cracklings and some people do not.

The Finished Candle

Warm Fat Poured into Jar Cool Fat inside Jar Wick Trimmed to 1/4 inch Lit Candle Made from Animal Fat

The Final Steps:
  1. Never pour extremely hot melted animal fat into a cold glass jar because the jar may crack or shatter. However, the melted fat should be warm enough so it can be poured as a liquid into the glass jar.
  2. After the bottom of the wick has been "glued" to the bottom center of the glass jar (as explained previously), then pour more melted fat into the jar to surround the wick up to about 1/2 inch (1.2 cm) from the top of the jar.
  3. Wait for the melted fat to cool and harden.
  4. Trim the exposed top of the wick so it is 1/4 inch (0.6 cm) long.
  5. Later when you need light simply apply a lit match to the candle wick.

Summary and Final Recommendations

  1. Candles made from animal fat will produce the same amount of light as a traditional wax candle because the light is produced by the burning wick.

  2. Animal fat candles may have a unique smell depending on the type of animal fat used. Candles made from beef fat do not have an unusual smell, in my opinion.

  3. Animal fat candles may create just a tiny bit more smoke than a wax candle depending on the type of animal fat used. Candles made from beef fat produce no noticeable smoke.

  4. Homemade cotton wicks may burn a little faster than normal candle wicks (depending on the quality of the homemade wick). Therefore the wick may gradually become too short to provide a good source of light. When this happens you can carefully pour a very, very small amount of the hot melted animal fat off the top surface of the candle into a new jar that already has your one extra wick glued to the bottom of the new jar. This will save the melted animal fat for use in your next candle but it will also expose more of the original wick in the original candle and the flame will now burn brighter and provide more light. I do this while the jar candle is still burning and I do not extinguish the flame so I do not need to light the candle again with another match. My experience has been that I need to do this every 45 to 60 minutes when the candle is first lit. After the candle has burned for awhile then the diameter of the glass jar that contains the melted animal fat gradually becomes a little smaller because of the taper of the jar. When this happens the amount of melted animal fat more closely matches the burn rate of the homemade wick and the jar candle will then continue to burn down and provide good light without my having to remove any more melted animal fat. Therefore the diameter of the glass jar that you use, and the quality of the wick that you use, and the type of animal fat that you use, will probably determine whether or not you will need to follow this procedure, and how often you will need to do this procedure.

  5. The glass jar will be hot when the candle is burning so do not touch the hot glass jar with your bare hands. Use an oven mitten or glove to move a burning candle inside a hot glass jar.

  6. When most of the animal fat has been consumed and only a very small quantity of melted animal fat remains in the bottom of the jar then you can make the decision on whether or not the light being generated by the wick is sufficient for your needs. If the light is adequate then you can allow the wick to gradually burn up and consume the last small amount of animal fat in the jar. However, if the light is not adequate then you could carefully pour the small amount of hot melted animal fat into your new jar with the extra wick that will eventually become your next candle. However, if the candle should go out and a small amount of the animal fat cools down and rehardens in the bottom of the jar then you can scrape the small amount of animal fat out of the bottom of the jar with a spoon and save it and add it to your next pot of animal fat and remelt it at that time and use it in your next candle.

  7. Based on my experience, a jar candle that contains melted beef fat will burn for approximately six hours for each one ounce (weight not volume) of melted beef fat that is inside the glass jar. In other words, if a jar candle contains two ounces of melted beef fat then it should burn for approximately twelve hours.


Additional Information
Braiding Instructions

How to Braid Three Strings, or Four Strings, or Six Strings to Make a Thick Candle Wick


Note: The following information is included in Chapter 36 of my book How to Tan Animal Hides and How to Make High Quality Buckskin Clothing.

The following instructions refer to rawhide strips but the same braiding process can be used to braid cotton string.

Three Strips: This is the same process as braiding someone's long hair. The right outside strip is brought across the top of the center strip and it becomes the new center strip. Then the left outside strip is brought across the top of the center strip and it becomes the new center strip. This process continues to the end of the braid.

Four Strips: The right outside strip is brought behind the two center strips and then it is immediately brought back around in front of and over the left center strip so that it now becomes the new right center strip. The left outside strip is brought behind the two center strips and then it is immediately brought back around in front of and over the right center strip so that it now becomes the new left center strip. This process continues to the end of the braid.

Six Strips: The right outside strip is brought behind the three strips that are beside it and then it is immediately brought back around in front of and over the last strip that it went behind so that it now becomes the third strip from the right instead of the fourth strip from the right. The left outside strip is brought behind the three strips that are beside it and then it is immediately brought back around in front of and over the last strip that it went behind so that it now becomes the third strip from the left instead of the fourth strip from the left. This process continues to the end of the braid.

Respectfully,
Grandpappy.


Grandpappy's e-mail address is: RobertWayneAtkins@hotmail.com

Home Page Hard Times Survival