Home Page Hard Times Survival Hard Times Recipes Gourmet Recipes Gardening Tips Firearm Facts Economy Book Reviews
Wilderness Survival Christian Poems Bible & Prophecy Bible Truths Other Information Children Stories Product Links Search Website My Books

How to Start a Friction Fire Using a Bow Drill

Copyright © March 1, 2017 by Robert Wayne Atkins, P.E.
All Rights Reserved.


The following article is included in my book: The Most Important Survival Skills of the 1800s.

Introduction

A family's long-term survival depends on a variety of things. Fire is one of those things.

Fire is an absolute necessity for all the following reasons:
  1. Boil water to neutralize the pathogens in the water that could kill you.
  2. Cook some plants to neutralize the toxins in those plants so they can be safely eaten.
  3. Cook some plants to make them more palatable and to release their nutrients and make them easier to digest.
  4. Cook meat to destroy any harmful micro-organisms that might be in the meat so it can be safely eaten and more easily digested.
  5. Low heat and smoke can be used to extend the shelf life of a variety of different types of fish and meat.
  6. Provide heat when the weather is really cold to protect your family from freezing to death.
  7. In an emergency fire can sterilize surgical tools so you use them without infecting a wound.
  8. In an emergency a red hot metal instrument can cauterize, sterilize, and seal a wound.
  9. In the wilderness a fire can help to discourage wild animals from attacking your family.

Disadvantages of Friction Fires

There are some people who say that they can start a friction fire using a bow drill in 60 seconds or less. However, the 60 seconds does not include the amount of time required to make the bow drill. If you are starting from scratch with nothing except a knife and a good piece of string, then it will probably take a few hours to find a suitable type of wood and then use that wood to build a functional bow drill. That is why I have consistently recommended that the best way to quickly and easily start a fire is with either a match or a butane lighter.

Another major problem with a bow drill is that if you are building one from scratch then you may need to conduct a variety of experiments to determine which of the woods that are available in your area can be successfully used to start a fire using friction. This can become a very boring and fatiguing trial and error process. If you relocate to a different area then you may have to repeat these experiments using the woods that are available in your new area.

Another major problem with friction fires is that they are extremely difficult to start on cold, damp, or windy days.
  1. Cold Weather: During really cold weather the surrounding cold air quickly saps the heat out of the friction you are trying to create in order to start a fire.
  2. Damp Weather: If the air is damp or humid then your tinder material will begin to absorb some of extra moisture in the air and your tinder may not be dry enough to ignite when it is needed. It also takes a lot more friction to start a fire during damp weather because your drill stick and your foot piece will also be absorbing some of the extra moisture in the air.
  3. Windy Weather: If the wind is blowing you will need to find a place out of the wind to start your fire. However, there may still be a draft in the area you select and that draft can pull the heat out of the friction you are trying to create to start a fire.
In addition, during rainy weather and freezing weather it is very easy to quickly become depressed, irritable, and fearful. Primitive fire starting methods are even more difficult to properly execute during these times of emotional stress.

However, if you have some really good very dry tinder that you have warmed using your natural body heat then you will increase your chances of getting a fire started but the odds will still be weighted heavily against you.


Comparison of a Bow Drill to Hand Spinning a Friction Stick

Fire Bow 
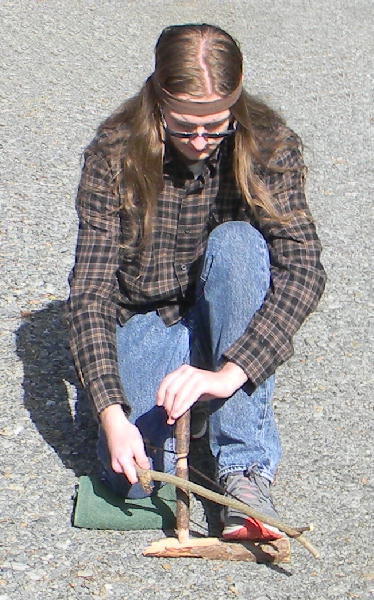
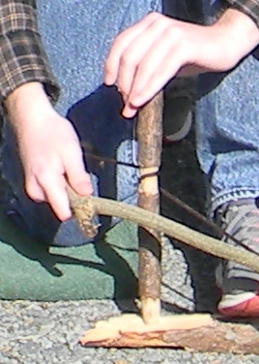
Hand Spinning Method:
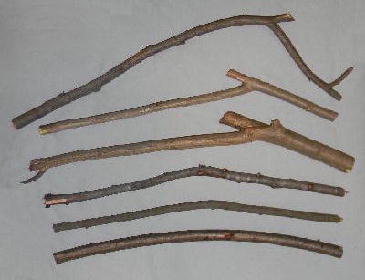
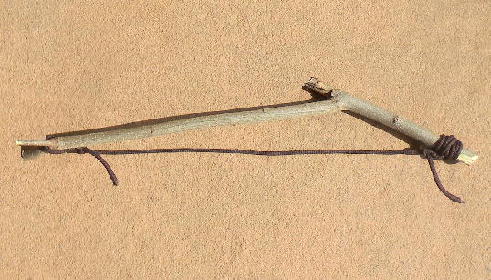
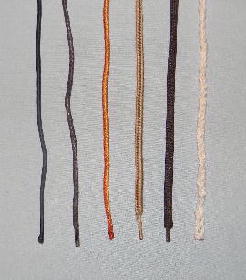
It is possible to start a friction fire by spinning a wood stick between the palms of your two hands. However, this is the most difficult and least successful method of trying to start a fire by friction. The reason is because you are trying to use the palms of your hands to do three things at the same time:
  1. Keep the stick upright and centered in the pivot hole.
  2. Provide rotation to the stick to create friction against the pivot hole.
  3. Push the stick down into the pivot hole to increase the pressure and apply more friction.
Hand spinning is also a poor method because the drill stick completely stops moving in one direction and it has to start moving in the opposite direction based on the length of your open fingers and palm, which is about 5 or 6 inches (12.7 to 15.2 cm). With a bow drill this reversal of direction happens after about 15 to 18 inches (38.1 to 45.7 cm) and therefore more friction is created before the drill stick momentarily stops and reverses direction.

Bow Drill Method: (Note: My grandson "Cree" is using a bow drill in the picture on the right.)

The bow drill method is better than the hand spinning method for the following reasons:
  1. You can knell on one knee in a comfortable position to start the fire using the fire drill.
  2. You use one hand on top of a piece of wood or rock to hold the top of the drill stick in position and to apply downward pressure on the drill stick.
  3. You use the other hand to operate the bow to keep the drill stick rotating.
  4. You can rotate the drill stick faster and start a fire in less time with a bow drill than when using the palms of your hands.
  5. Your hands do not become tired and blistered by making contact with the drill stick.
  6. A bow drill will successfully start a fire in some situations when the palm method would not be successful.


Two Ways to Start a Friction Fire Using a Bow Drill

There are two similar but uniquely different ways to start a friction fire using a bow drill:
  1. The Traditional Indian Way: This is the method my Cherokee Indian ancestors used to start their fires and it will be described first.

  2. The Current Non-Indian Way: This is the method that currently appears everywhere on the internet (March 2017) and it is also the method that is described in every wilderness survival manual that I have purchased that contains instructions on how to start a fire using a bow drill.
Both of the above methods use the same eight basic necessary components.
Both of the above methods spin the drill stick in the pivot hole of the foot piece in the same way.
The two methods are different in how the fire is started after a red hot coal has been generated by the bow drill.


The Components of a Bow Drill Set

To make a fire using a bow drill you will need the following items:
  1. Bow Stick: A stick that is between 20 to 25 inches long (51 to 64 cm) with a diameter of between 1/2 to 7/8 inches (1.3 to 2.2 cm).
  2. Bowstring or Thong: A piece of string, or a shoelace temporarily removed from one of your shoes or boots, or a piece of flexible strong thin vine. Normally a thicker string works better and lasts longer than a thinner string.
  3. Hand Piece: A hollowed out piece of wood, or rock, or shell that will fit around the top of the drill stick.
  4. Drill Stick: An extremely dry straight stick between 8 to 11 inches long (20 to 28 cm) with a diameter between 0.75 to 1.25 inches (1.9 to 3.2 cm).
  5. Foot Piece (or fire board): A piece of wood at least 3/4 inch thick (1.9 cm), and at least 9 inches long (23 cm), and with a pivot hole carved near one end of it to hold the bottom of the drill stick.
  6. Tinder: Some type of flammable material that has a relatively low combustion temperature.
  7. Kindling: Very thin small sticks that can be placed on the tinder material.
  8. Firewood: Gradually larger sticks that can be used to build the size and type of fire you require.
  9. Optional Knife: A sharp knife will make the process much, much easier but a knife is not absolutely necessary.
Now let's examine each of the above items one-at-a-time in more detail.

Bow Sticks bowstrings Bow and String
Potential Bow Sticks Potential Bowstrings Bow With String Attached

1. Bow Stick:
All the bow sticks in the above picture on the left were between 21 to 23 inches long.
A bow stick can be dead wood or freshly cut wood from a live tree. You may use any type of wood that is available in your area and that will function correctly as a bow. If possible the bow stick should be slightly curved. If it is relatively straight then it should have some flexibility so a piece of string can bend the stick into a curved bow shape. A short piece of freshly cut live (green) wood will work as a bow stick if it is flexible.
The bow stick can be a smooth continuous piece of wood as shown in the bottom three examples in the above picture on the left. Or the bow stick can be a main branch of wood with a smaller branch extending from it as shown in the top three examples in the above picture on the left. If possible, leave a short piece of a side branch extending from one or both ends of the bow stick to help hold the bowstring in position and to prevent the bowstring from gradually sliding towards the center of the bow during use.

2. Bowstring:
The bowstring should be at least 12 inches longer than the bow stick so the string can be tied to both ends of the bow stick.
The bowstring can be almost any type of string, twine, or thong that does not stretch and that is flexible.
The above picture in the middle shows five different types of boot and shoe laces and a piece of braided white cotton string on the far right of the picture.
Nylon 550 Military Grade Paracord works exceptionally well as a bowstring.

Attach the Bowstring to the Bow Stick:
Whittle a very small notch in both outside ends of the bow stick about 1/2 inch from each end. Tie the string to the stick so the string fits into the notch. The string should have a little slack in it. Put the drill stick against the string and wrap the string around the drill stick one time at the area that has been previously whittled to receive the bowstring. This should make the string more taut and it should put pressure on the two ends of the bow stick.
If the bowstring is not quite taut enough when you are using it then undo the knot at one end of the bow stick and retie the knot to take up some of the extra slack in the string.
If the bowstring starts to stretch after you begin using it then you can change your hold on the bottom end of the bow stick and grasp the string with your hand and pull the string tight against the bow stick to take up some of the slack (or string stretch) so you can finish your task of starting a fire.

3. Hand Piece:
The hand piece can be made from almost any type of material.
The hand piece has the following three basic functions:
1. Holds the top of the drill stick in position.
2. Allows the drill stick to rotate freely and smoothly.
3. Allows the hand to push down on the hand piece to apply pressure to the other end of the drill stick in the pivot hole in the foot piece.

Any item that will accomplish all the above may be used. Several hand pieces are illustrated in the picture below:
    Hand Pieces
  1. Wood Branch: A short piece of branch was split in half. A round hole was whittled into the center of the split side of the branch and the hole should be just a little bigger than the top diameter of your drill stick. The top curved side of the hand piece can now be held in the palm of the hand.
  2. 2x4: A round hole was whittled into a short piece of 2x4 lumber.
  3. Round Wood Dowel: A drill can be used to drill a hole in a short piece of round wood dowel.
  4. Metal Pipe Cap with Internal Threads: Metal caps are available in a variety of different sizes, they have internal threads inside the cap but the threads do not interfere with the rotation of the drill stick, and they fit nicely over the top end of a drill stick. A metal cap with a 0.875 inch (2.2 cm) inside diameter works well and it costs less than three dollars.
  5. Plastic Water Pipe End Cap: Plastic caps are available in a variety of different sizes, they have a smooth inside diameter that comes to a gently rounded curve on the top inside of the cap. They make excellent hand pieces. A plastic cap with a one inch (2.5 cm) inside diameter works well and it costs less than one dollar.
4. Drill Stick:
Drill Sticks 
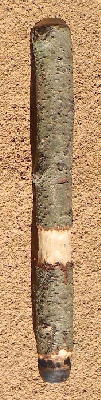
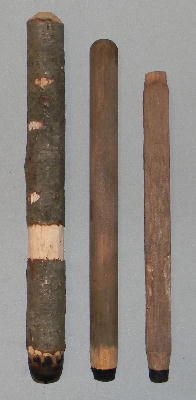
The drill stick should be a dry straight stick between 8 to 11 inches long (20 to 28 cm) with a diameter between 0.75 to 1.25 inches (1.9 to 3.2 cm).
The top end of the drill stick should be smoothly rounded so it will rotate easily in the cavity inside the hand piece.
The bottom end of the drill stick should be tapered for approximately one inch to a rounded curved end (not a sharp point). This end of the drill stick will be rotating in the pivot hole in the foot piece and it will be creating the friction that yields a red hot coal.
  1. If the drill stick has bark on it (left drill stick in the picture) then a small portion of the drill stick should be whittled with a knife to remove the bark so the bowstring can make better contact with the drill stick. The whittling should be done about three to five inches from the bottom of the drill stick depending on the length of the drill stick (closer to the bottom on shorter drill sticks).
  2. If the drill stick is already round (middle drill stick in the picture) and it does not have any bark then the drill stick does not need to be whittled for the bowstring. The middle drill stick in the picture was the top end of the wood handle of an old worn out broom.
  3. If the drill stick is a square piece of wood (right drill stick in the picture) then a small portion below the middle of the drill stick should be whittled so that it has eight flat sides. This will help the bowstring make good contact with the drill stick and it will also result in a smoother more even rotation of the drill stick.
If the drill stick is whittled in the middle then this will also help keep the bowstring from slipping up or down on the drill stick.
If the bowstring makes contact with the drill stick at or below its center (but a least three inches from the bottom of the drill stick to prevent scrapping your knuckles on the foot piece or the ground) then this will help to keep the bottom end of the drill stick in the pivot hole and it will also help to minimize the amount of effort required to keep the top end of the stick stationary using the hand piece.
A longer drill stick is easier to hold in a straight up and down position so that it does not wobble as it is being rotated by the bowstring.

If possible very lightly lubricate the top of the drill stick prior to each use to minimize friction against the top piece and to increase the ease with which the drill stick will rotate. Any of the following lubricants will work well:
  1. If you have some candle wax or some soap then rub a little of it on the top of the drill stick.
  2. If you are going to cook a wild game animal that you have just killed, then rub a small piece of the fat from the animal onto the top of the drill stick in order to lubricate the top of the drill stick.
  3. If you can easily and safely remove some of the excess wax that is inside your ear with the tip of your little finger then apply the ear wax to the top of the drill stick.
  4. If your hair is naturally oily then gently move the top end of the drill stick through your hair to transfer some of your hair oil onto the top end of the drill stick. Be careful and do not let the drill stick make contact with your scalp and scratch you.
Do not lubricate the bottom end of the drill stick because this is where you want the friction to occur to start a fire.

5. Foot Piece:
Start 
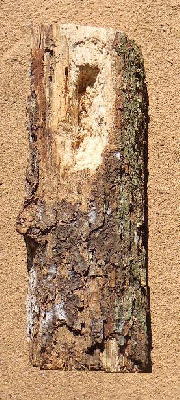
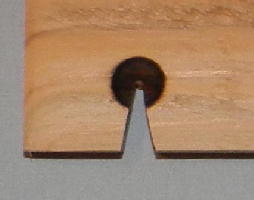
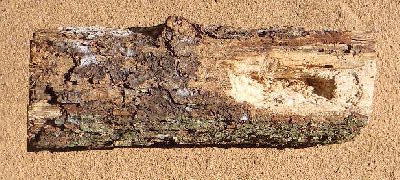
The foot piece in the picture on the right is a 9 inch long (23 cm) piece of firewood that was split in half using a hatchet. The split flat side of the foot piece should be placed facing the ground for stability. Only a very small portion on the top right side of the foot piece was whittled with a knife in order to carve a pivot hole and an air groove (explained below). However, this foot piece clearly illustrates that you do not need to invest a lot of time and effort in creating a foot piece that looks really nice.

Type of Wood:
The foot piece and the drill stick can be made of the same exact type of wood, or they can be made from different types of wood. Good results can be achieved either way. However, if the foot piece and the drill stick are of the same type of wood then they will usually create a fire more easily. If the wood will not successfully start a friction fire then you will be able to eliminate that type of wood and select a different type of wood and try again.
The wood must be dead wood that is very dry. It should not be crumbly or decayed. Do not use freshly cut wood from a living tree because the wood will contain too much moisture to start a fire using friction.
The wood should not be too soft or too hard. However, the wood needs to be strong enough to produce good friction.
If the powder residue that is created in the pivot hole is too coarse and brown then the wood you are using is probably too soft.
If the powder residue that is created in the pivot hole is extremely fine then the wood you are using is probably too hard.
Wood that is either too soft or too hard will not easily produce a friction fire.
Good woods include aspen, cedar, cottonwood, cypress, elm, fir, pine, poplar, spruce, sumac, tamarack, and willow, depending on what is commonly available in the geographical area in which you live.
(Note: If you are in an area where old dry flat lumber is available, then you can use almost any type of old lumber. Wood lumber that has gradually turned gray as the result of time usually works very well. However, the wood must be extremely dry.)

Foot Pieces and Air Groove 
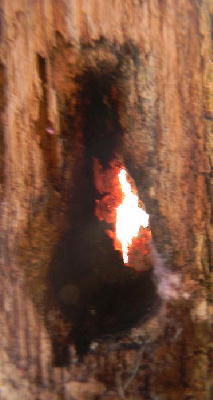
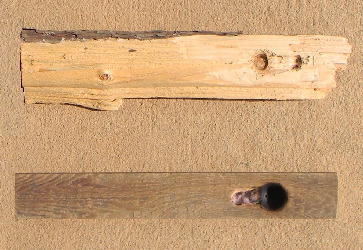
Foot Piece Pivot Hole:
Use your knife to carve a pivot hole about three or four inches (7.6 to 10.2 cm) from the end of the foot piece and centered between the two sides of the foot piece. The top diameter of the pivot hole should be a little larger than the bottom diameter of the drill stick. The pivot hole should be at least 1/4 inch (0.6 cm) deep into the foot piece and it should be big enough so the end of the drill stick will fit into the pivot hole and not slide out when the drill stick is rotating. Do not carve the pivot hole too big because the pivot hole is where the friction will take place and this is what will produce the red hot coal that will be used to start the fire.

Foot Piece Air Groove:
Carve a short groove in the top of the foot piece beside and touching the pivot hole about one or two inches (2.5 to 5.1 cm) long and about one-half inch (1.3 cm) down into the foot piece and about one-half (1.3 cm) inch wide. It doesn't make any difference if you carve the groove on the left side or the right side of the pivot hole. In the picture on the right the top foot piece was 10.5 inches (26.7 cm) long and 2.25 inches (5.7 cm) wide and the groove was carved on the right side of the pivot hole. The bottom foot piece in the picture was 10.5 inches (26.7 cm) long and 1.5 inches (3.8 cm) wide and the groove was carved on the left side of the pivot hole. Both foot pieces were tested with a drill stick to smooth out the pivot hole and to verify that the foot piece would create powder residue.
The groove beside the pivot hole will catch and hold the black powder residue from the drill stick when the drill stick is rotated. The groove will also allow air to circulate into the pivot hole so that a red hot coal can be created as a result of the friction from the drill stick. The red hot coal will be produced inside the foot piece and it will remain inside the foot piece.

When you first start rotating the drill stick in the pivot hole in the foot piece, the end of the drill stick and the hole in the foot piece will gradually begin to wear away and the shape of these two items will gradually become a perfect circle that allows for the creation of friction that yields good heat where they touch one another.

6. Tinder:
Kindling 
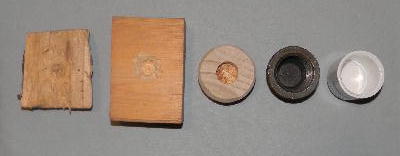
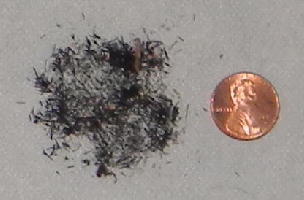
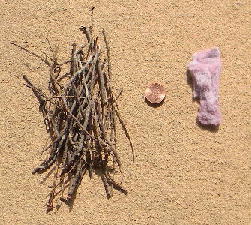
Tinder is extremely important when starting a fire. Tinder is any material that will burst into flames without having to be exposed to a flame. The most important property of the tinder material is the minimum temperature at which it will ignite and catch on fire. A tinder's minimum combustion temperature is a function of its density, its surface area, and how well the material resists the absorption of humidity from the surrounding air.
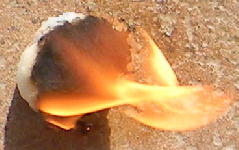
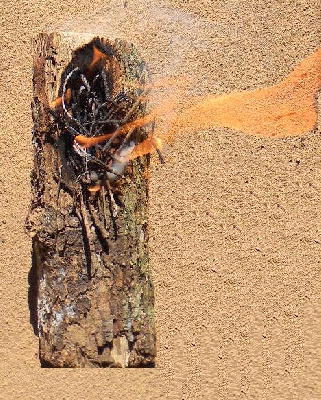
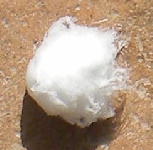
I have actually tried many of the different tinders that are recommended for starting a friction fire. I have been disappointed with all of them except one: clothes dryer lint. Clothes dryer lint is the tinder material I have recommended on my website for at least ten years. Clothes dryer lint has an extremely low combustion temperature, and it is composed of extremely small particles, and it will burst into flame quickly when exposed to the minimum amount of heat that is required to ignite it. Therefore I recommend clothes dryer lint as the best tinder to use with a bow drill to start a friction fire. Clothes dryer lint can be peeled off the lint screen of a clothes dryer and saved inside a heavy duty plastic freezer bag, or it can be saved inside a plastic food storage container with a tight fitting lid. This will help to prevent the clothes dryer lint from absorbing the natural moisture in the air which would reduce its effectiveness as a tinder material. A small amount of clothes dryer lint is shown on the right side of the penny in the picture on the right.

(Note: Clothes dryer lint will also burst into flames after about 15 seconds of being exposed to the focused rays of the sun using a magnifying glass, and it will also quickly catch fire from the sparks generated by a piece of fire steel.)
Ball on Fire Cotton Ball
All good tinder will burn up very fast. Therefore you must add the kindling as quickly as possible after the tinder starts burning or the tinder will be completely consumed and then you will have to start over.

(Note: An item that has been drenched in petroleum or in lighter fuel will catch fire very quickly. But it is the petroleum that is igniting. An example would be a cotton ball saturated with petroleum jelly (picture on right). I don't mind if other people start a fire with these items but I prefer to use a tinder that is not saturated with some type of petroleum product.)

7. Kindling:
Kindling is any material that will catch fire and burn rapidly when it is exposed to a flame. This is not the same thing as tinder because kindling will not catch fire unless a flame is present. Short very thin dry sticks are the most common type of kindling. Some kindling is shown on the left side of the penny in the picture of the clothes dryer lint. (Note: My five-year old granddaughter "Ashlyn" helped me collect the kindling shown in the above picture.)

8. Firewood:
Firewood consists of larger sticks and larger pieces of wood that are added to a fire after the fire is burning well.


How to Start a Friction Fire with a Bow Drill
Using the Traditional Indian Method

It will take between 10 to 15 minutes after you start rotating the drill stick to get the tinder material to catch on fire.
String Wrap
  1. Select a safe location to build a fire that is out of the wind. Clear the fire area for a diameter of at least three feet or one meter. Have enough water close to the fire area in order to completely extinguish the fire if it becomes necessary.
  2. Wear safety glasses to protect your eyes: (a) if the drill stick should pop out of the pivot hole, and (b) if some sparks should pop out of the pivot hole when you are blowing on it to catch the tinder on fire.
  3. Be careful that you do not burn your fingers or your hands. Leather gloves can help to protect your fingers and hands. However, leather gloves make it difficult to pick up the tinder and the small pieces of kindling. Therefore I do not wear leather gloves, but I am very careful where I put my hands, and I can quickly pick up and place the tinder and the kindling when they are needed.
  4. Place the foot piece in the center of the fire area that you have prepared in the spot where you want your future fire to be.
  5. If the sun is shinning then face the sun so the rays of the sun will fall on the pivot hole in the foot piece. Do not block the sun with the shade from your body unless it is necessary because of your current situation.
  6. Knell on one knee. If you are right handed then put your right knee on the ground and bend your left knee.
  7. Place the inside ball of your left foot on one end of the foot piece. Use your foot to hold the foot piece securely against the ground with the pivot hole facing up.
  8. Wrap the bowstring one turn around the drill stick as shown in the picture with the top end of the bowstring going towards your right hand and the bottom end of the bowstring going towards the opposite tip end of the bow. If the string is not wrapped around the drill stick as shown in the picture then the string will not be able to easily rotate the drill stick and the drill stick will pop out of the pivot hole. (Note: My 21-year old grandson "Cree" is demonstrating the correct way to start a friction fire using a bow drill.)
  9. Place the tapered bottom of the drill stick in the pivot hole in the foot piece.
  10. Hold the top piece in your left hand and place your left wrist firmly against the outside of your left leg to help hold your left hand stationary and place the inside center of the hand piece on top of the drill stick directly above the pivot hole in the foot piece so the drill stick is positioned straight up. Generally only a little bit of pressure is required on the hand piece to keep the drill stick in the correct position. However, you can apply a little more or a little less downward pressure on the hand piece to increase or decrease the friction of the bottom end of the drill stick in the pivot hole in the foot piece based on your previous experience using the type of wood that is available in your geographical area.
  11. Firmly grasp the inside end of the bow stick in your right hand. Hold the bow so that it is horizontal or at a slight angle with its opposite pointed towards the ground. Pull and push the bow back and forth in slow smooth steady strokes almost the full length of the bowstring and this will rotate the drill stick. The drill stick should gradually wear a depression in the hand piece and in the foot piece that matches the diameter of the rounded ends of the drill stick. When the drill stick feels like it is moving smoothly as you pull and push the bow then stop, remove the drill stick and very lightly lubricate the top end of the drill stick, and proceed to the next step.

    Foot Piece Drill Stick Red Hot Coal Smoke Fire
    Foot Piece Drill Stick Red Hot Coal in Pivot Hole Smoking, Tinder, Kindling Fire Burning Extremely Well

  12. Place a small handful of tinder and a large handful of kindling about two inches away from the foot piece so they can be quickly moved onto the pivot hole when they are needed.
    Punk Powder
  13. With everything in its correct fire starting position, firmly grasp the hand end of the bow stick in your right hand. Hold the bow so that it is horizontal or at a very slight angle with its opposite end pointed towards the ground. Pull and push the bow back and forth in smooth steady strokes almost the full length of the bowstring and this will rotate the drill stick. The bottom end of the drill stick and the pivot hole in the foot piece will both begin to wear away and the rotating motion of the drill stick will push the residue that is created into the shallow groove that you whittled into the foot piece beside the pivot hole. The technical name for this residue is "punk." The initial residue may be dark brown but then the residue will become black. The objective is to produce a very fine black powder. It takes about 30 seconds to start producing black powder "punk" and you will also be able to detect a very mild burnt smell. After about 60 seconds the pivot hole will begin to smoke just a little. After about 90 seconds the pivot hole will begin to smoke a lot.
  14. The new objective is to increase the amount of heat without creating a lot of new black powder residue. Relax the pressure on the top piece just a little bit and increase the speed at which you have been pushing and pulling the bow stick for at least sixty more seconds. Then remove the bow and the drill stick.
  15. Carefully pick up the foot piece by its cold end and very gently blow on the smoking residue in the pivot hole in the other end of the foot piece. In a minute or two a red hot glowing coal should appear. Continue to gently blow on the red hot coal until it increases in size and it is producing a lot of smoke. Put the foot piece back on the ground where you want your fire to be. Gently push the tinder onto the top of the glowing coal and lay the kindling in a loose pile on top of the tinder. Be careful to not get burned and continue to blow very gently on the smoking pivot hole and the tinder. When the tinder and the kindling bursts into flames then immediately add some slightly larger pieces of firewood to make the small fire a little bigger. (Note: If you blow too hard then you will blow out the coal the same way you would blow out a candle.) (Note: If the red hot coal goes out then remove the tinder and the kindling and begin again at step 12 above.)
  16. Continue to add slightly larger pieces of firewood to the fire until you achieve the size of fire you require. The foot piece will now become part of the firewood in your new fire and the foot piece will gradually burn up.

How to Start a Friction Fire with a Bow Drill
Using the Method Everyone Else Currently Recommends

V Shaped Notch On March 1, 2017 all the bow drill instructions on the internet, and all the companies that sell bow drill kits on Amazon, and all the survival manuals I currently own, all recommend starting a friction fire with a bow drill using a foot piece that is designed as follows:

Cut a "V" shaped notch into the front edge of the foot piece so the black powder residue can fall down and accumulate on the ground, or on a piece of bark, or on a piece of leather that is below and in front of the "V" shaped notch in the foot piece. This makes it really easy to remove and save the foot piece after the red hot coal has fallen off the foot piece onto the ground or onto the item that was placed below the "V" shaped notch.

After the red hot coal has fallen off the foot piece then do one of the following:
  1. If the coal has fallen on the ground then place your tinder material on top of the red hot coal and start blowing on the coal and the tinder until the tinder catches fire. Then quickly add your kindling to the tinder to keep the fire going.
  2. If the coal has fallen on something under the "V" shaped notch then pick up the piece of bark or leather than contains the red hot coal and drop the coal onto the tinder material. Loosely wrap the tinder material around the red hot coal. Pick up the tinder with the red hot coal inside and blow on the coal until the tinder catches fire, or twirl the tinder wrapped coal around in the air until the tinder catches fire. Then immediately put the burning tinder on the ground and add kindling to keep the fire burning. (Note: In my opinion a person could easily get burned using this procedure and therefore I do not recommend it.)
The next time you use the foot piece you will need to start a new pivot hole about two inches away from the first pivot hole, and you will need to cut a new "V" shaped notch in that new pivot hole. This will allow you to use the same foot piece three, four, or five times before the foot piece is eventually used up.

I fully realize that my recommendation of carving a small air groove beside the pivot hole in the foot piece, and allowing the red hot coal to remain in the foot piece, and putting the tinder and kindling on the foot piece, and allowing the foot piece to burn up, does not agree with the above recommendations. However, I prefer to follow the method used by my Cherokee Indian ancestors. They knew the foot piece was nothing more than just another piece of firewood and they did not invest any unnecessary time and effort trying to make the foot piece look impressive. The also did not try to save the foot piece so it could be used to start a few more fires before it was eventually consumed. However, they would reuse the bow stick, the bowstring, the hand piece, and the drill stick until those items eventually wore out. But they would use a new foot piece for each new fire they started.


Amount of Work

There are some people who say that starting a fire by friction is relatively easy and that it does not involve a lot of work.

I do not agree.

Instead I agree with what the Holy Bible says as follows:
In the days of Moses there were no matches or butane lighters. Fires were started by friction or with sparks. Starting a fire using one of these methods was considered to be work in the days of Moses. It is interesting to note that starting a fire was the only example of work that was specifically mentioned as not being appropriate on the Sabbath day.

Today a fire is really easy to start with a match, or with a butane lighter, or with the pilot light on a gas stove, or with the electronic ignition on a gas stove. Therefore I suspect it is okay at the current time to start a fire on the Sabbath day unless a person is a Jew and that person wants to use friction or sparks to start the fire. But this is just my opinion.

Respectfully,
Grandpappy.


Grandpappy's e-mail address is: RobertWayneAtkins@hotmail.com

Home Page Other Articles