


How to Make a Gill Net without Fishing Line
The Easy, Efficient Way to Catch Fish for the Frying Pan
(Check Your State and Local Laws for any Restrictions on the Use of Gill Nets.)
Copyright © August 14,2017 by Robert Wayne Atkins, P.E.
All Rights Reserved.
The following article is included in my book: The Most Important Survival Skills of the 1800s.
Introduction
The easiest way to acquire a high quality Gill Net is to purchase one on ebay, or Amazon, or at the following internet website: https://www.texastastes.com/gill-nets.htm
I do not earn a commission or a fee of any type if you click on the above link or if you purchase something from the above website. The above link is only being provided for your convenience.
If you wish to make your own Gill Net then the best material to use is either Monofilament or Nylon fishing line. Instructions for creating a Gill Net using fishing line are on my website at the following internet address: How to Make a Gill Net Using Fishing Line
If you do not have access to fishing line then it is possible to create a functional Gill Net out of thin lightweight strong waterproof twine, or from a variety of other materials such as animal sinew or pliable plant fibers. However these other materials have the following disadvantages when compared to commercial quality fishing line.
- They are usually thicker than fishing line and they are easier for fish to see in the water.
- They do not cling to a fish as well as fishing line and therefore it is a little easier for a fish to escape from the net.
- The material is usually not designed for long-term submersion under water and therefore they will usually wear out faster.
However, a Gill Net made from some material other that standard fishing line will still catch more fish with less effort that a conventional fishing rod and reel. Therefore you should use whatever material you have available and create a Gill Net that will be of the proper size for your intended application.
Since you will not be using fishing line to construct your Gill Net you should not follow the instructions for making a fishing line Gill Net. Instead there is a different method for making a Gill Net when the material that is used is not fishing line. This article contains those instructions.
Instructions for Making a Gill Net without Fishing Line
Gill Net Materials:
You will need the following materials:
1. Two thick waterproof ropes: one for the top cord and one for the bottom cord.
2. Waterproof twine, or animal sinew, or pliable plant fibers: use to make the interior mesh of the Gill Net.
Gill Net Design:
Determine the length and width of the Gill Net you wish to make. Also make a decision on the size of the mesh pattern. The best average size is between 1.5 to 1.65 inches per side of the mesh square (or diamond). This size will catch more fish of edible size and a few larger fish. Smaller mesh sizes are not effective. Larger mesh sizes will catch larger fish but the larger mesh allows more of the average size edible fish to escape.
Gill Net Assembly Instructions:
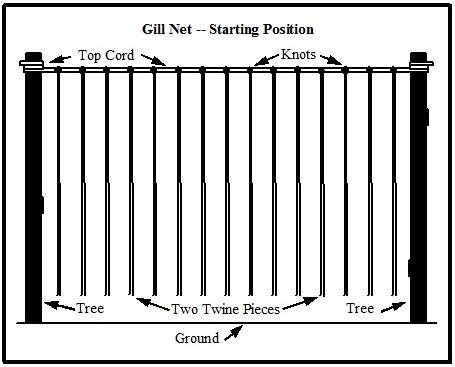
- Tie the horizontal waterproof top cord between two trees, posts, or other fixed objects.
- Depending on the thickness of your twine, the length of each piece of vertical twine will need to be at least 4 times longer than the finished size of your Gill Net. Therefore if you want a Gill Net that is 4 feet from top to bottom then each piece of twine should be at least 16 feet long.
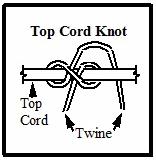
- Fold each piece of twine in half. Tie the middle of the first folded twine to the top cord close to the tree. Use the "Top Cord Knot" in the illustration below. If you want a 1.5 inch mesh pattern then tie the middle of each piece of twine to the top cord 1.5 inch from the previous piece of folded twine. Continue to the other end of the top cord.
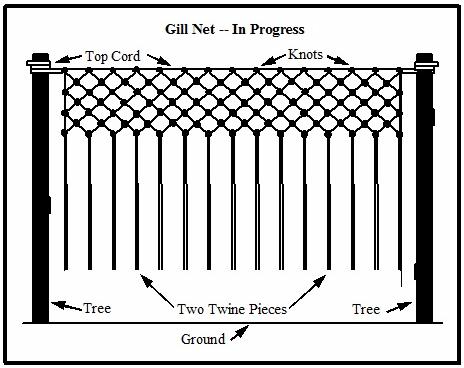
- Tie a spacer twine from left to right between the two trees at a distance of 1.25 inches below the top cord (if you will be making a 1.5 inch mesh pattern).
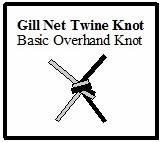
- Work from left to right (or from right to left if you prefer) and start at the last twine at the end of the top cord. One of the two pieces of the outside end twine will become the straight outside edge of the Gill Net. Tie the other piece of the last twine (in the first position on the top cord) using a simple overhand knot (see above illustration) to one of the two pieces of twine that is attached to the second knot on the top cord. Now take the other piece of twine in the second position and tie it with an overhand knot to one of the two pieces of twine attached to the third knot on the top cord. Tie all the knots on the first row of meshes so the knots are level with the spacer twine and approximately 1.25 inches vertically below the top cord. If you measure the diagonal distance along the side of the mesh from the top cord knot to the knot that joins two twine pieces then the distance should be 1.5 inch long.
- Continue this procedure to the other end of the Gill Net and allow the last twine to hang down straight to form the other outside edge of the Gill Net (see above illustration).
- Move the spacer twine down 1.25 inch on the two side trees so the spacer twine is now 1.25 inch below the first row of twine knots beneath the top cord.
- Starting at the left side of the Gill Net tie one of the two pieces of twine hanging down from the first knot below the top cord to the straight piece hanging down the left side of the Gill Net. Tie the second piece of twine below the first knot below the top cord to one of the pieces of twine hanging down from the second knot below the top cord. Continue to the right end of the Gill Net and tie the last remaining twine to the straight twine at the right end of the Gill Net. (Note: The outside pieces of twine on each end of the net hang straight down and their length is only reduced by the knots tied in the end pieces. When you finish making the net the two straight outside edge pieces of twine will be longer than the other twine that creates the diamond mesh pattern inside the net.)
- Continue moving the spacer twine down 1.25 inch and continue tying the pieces of twine to form the mesh pattern for the Gill Net. When you reach the bottom of the Gill Net tie a second piece of thick waterproof rope between the two trees and secure the ends of the twine pieces to the thick bottom rope of the Gill Net.
- Securely lash both top outside folded twine ends to the top cord of the Gill Net to prevent them from sliding along the top cord. Also securely lash both bottom outside twine ends to the bottom cord of the Gill Net to prevent them from sliding along the bottom cord.
Gill Net Use Instructions:
Detailed instructions on how to use a Gill Net are on my website at: How to Make a Gill Net Using Fishing Line
Respectfully,
Grandpappy.
Grandpappy's e-mail address is: RobertWayneAtkins@hotmail.com