I continue to occasionally meet some people who have nothing nice to say about handgun lasers.
On the other hand, most of the people I talk to appreciate the advantages of a laser when it is added to a handgun.
The purpose of this article is to briefly review the advantages and disadvantages of different types of lasers.
Discussion
Handgun lasers come in a variety of different configurations. This article will only discuss three of those options:
Internal Guide Rod Laser with Manual On/Off Switch.
Under-Barrel Laser with Manual On/Off Switch.
Under-Barrel Laser with Automatic On/Off Activation.
Manual On/Off Internal Guide Rod Laser
Manual On/Off Under-Barrel Laser
Automatic On/Off Under-Barrel Laser
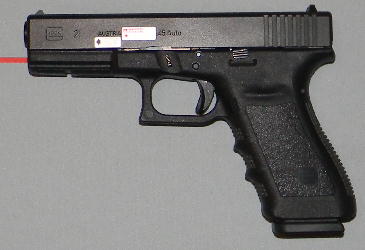
Manual On/Off Internal Guide Rod Laser: This was the first laser I installed on a Glock 40 Caliber handgun in the year 2009. The laser is activated by pushing the slide lock on the side of the slide slightly into the slide. This is relatively easy to do if you first pull back on the slide about 1/8 inch and then push on the slide lock. If you do not move the slide back about 1/8 inch then the slide lock is very difficult to push. With the passage of time, the electrical contact on the slide lock gradually became oxidized and the laser would not activate. After operating the slide lock about 20 times, the oxidation rubbed off the electrical contacts and the laser activated correctly. It takes time and patience to activate this type of laser. It is also more challenging to replace the battery when it wears out. This type of laser did not change the exterior of the handgun and it would easily fit into any holster designed for the handgun.
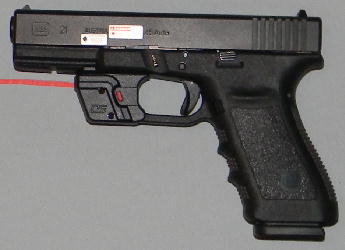
Manual On/Off Under-Barrel Laser: This laser was very easy to install with just two screws. The red laser beam required a very simple adjustment using the enclosed wrench to align the beam with the iron sights on the pistol. The red button activates the laser from either side of the laser. The laser is very easy to turn on and off and it only takes about 1 second to push the red button. The red button is very visible and it is easy to see and find because it sticks out just a little from the laser inside its own special groove on both sides of the laser mounting. As can be seen in the above center picture, the red button is in a slightly recessed groove and the exposed part of the red button does not extend out past the raised grove that is above and below the button. This prevents the red button from being accidentally depressed when the pistol is inserted into a normal holster. When the laser was mounted on the pistol the configuration was small enough that it did not require a different holster because there was already a small clearance in the holster below the front barrel. However, the laser caused the handgun to ride about 5/8 inch higher in its holster but the handgun still fit nicely in its original holster by simply raising the thumb strap a short distance. The slightly higher position of the handgun in its holster actually made it easier to grasp the handle of the handgun and remove it from the holster. Of the three lasers illustrated above, this was the most affordable laser, it was the easiest laser to install, it was extremely easy to turn on and off, it did not require a new holster, and overall it is currently my favorite laser. The above laser is made by Crimson Trace Model Defender DS-121 for Glock pistols and it can be purchased on "Amazon" or "Optics Planet" for less than $90 (February 2019).
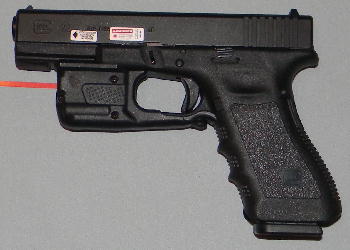
Automatic On/Off Under-Barrel Laser: This laser was relatively easy to install using three screws. There is a tiny on/off button on the underside of the laser that can be moved with your fingernail. When "on" the laser does not actually come on until your hand grips the pistol in a normal shooting position and this automatically activates the small button under the trigger guard where it makes contact with the hand grip. This under-barrel laser extends so far forward that a special holster had to be purchased that would accommodate the pistol with a laser mounted on it. This laser cost more, it required a new holster, and the tiny on/off button is not easy to see or activate. In an emergency you may decide to not waste time trying to find the tiny switch. Or you could simply leave the laser "on" all the time knowing that the laser will not activate until you actually grasp the handgun. This laser has three settings: laser only, white flashlight only, or combination laser/flashlight at the same time.
Lasers are now available in red or green.
1. The red lasers are more affordable.
2. The battery lasts about twice as long in a red laser.
In my opinion, the under-barrel lasers are now a better option than the internal guide rod lasers.
Since I had already installed an internal guide rod laser on each of my Glock pistols, I did not remove that laser when I installed the new under-barrel laser on the pistol. Each Glock pistol now has two red dot lasers equipped and this provides an immediate back-up laser if the battery in one of the lasers fails when it is really needed.
Respectfully,
Grandpappy.
Grandpappy's e-mail address is: RobertWayneAtkins@hotmail.com