


The common, ordinary acorn is one of the ancient foods of mankind. The first mention of acorns for human consumption was by the Greeks over 2,000 years ago. Over the course of human history it has been estimated that people have eaten more acorns than both wheat and rice combined. The acorn has served as an important famine food for many centuries. Acorns may be eaten alone or in a wide variety of acorn recipes.
Native American Indian tribes all across North America, such as the Cherokee, Pima, and Apache, used acorns as one of their primary staple foods in the same way they used corn. American Indians understood the food value of the acorn and how to prepare it for human consumption. Some Indian tribes would bury their acorns in the mud for many days and then dig them up and dry them in the sun. Other Indian tribes would put their acorns inside a reed basket with a few heavy rocks and then put the basket in a fast moving stream for several days. Both of these methods removed the tannin in the acorns and made them fit for people to eat. There is now an easier, more scientific method and it will be described in detail as you continue to read.
One tall mature oak tree can produce almost one-thousand pounds of acorns in one growing season during normal weather conditions. Acorns have a low sugar content and therefore help control blood sugar levels. They have a sweet nutty aftertaste. Acorn meal may be used in bread and stew recipes, substituting acorn meal for approximately one-fourth of the flour. Since acorns contain natural sweetness, reduce any other sweeteners in the recipe by one-fourth. Acorn grits can be used in place of nuts in cookie, brownie, and bread recipes. Acorns are a reliable source of carbohydrates, protein, 6 vitamins, 8 minerals, and 18 amino acids, and they are lower in fat than most other nuts. One handful of acorns is equivalent in nutrition to a pound of fresh hamburger.

White Oak: White oak trees live between 450 to 650 years (and longer). They can exceed 4 feet in diameter and 100 feet tall. The white oak is the most common species of oak tree. The leaf has a dark green glossy top side and a light green under side. The leaf lobe ends (edges) are rounded. White oak acorns mature in one growing season. Acorn production is heaviest approximately every third year. The inner shell of white oak acorns is smooth and the inner nutmeat is whitish in color. Split one of the inner nutmeats in half and you will see the whitish color. This is why the tree is called a white oak. White oak acorns are low in tannic acid and are naturally sweet and may be eaten with minimal processing. They are the best acorns for use in acorn recipes.

Red Oak: A red oak tree leaf has a glossy green top side and a fuzzy under side. The leaf lobe ends are very pointed. Red oak acorns require two years to mature. Red oak acorns have a hairy lining inside the shell and the nutmeat is yellowish in color. They are very high in tannic acid and therefore taste very bitter. Red oak acorns MUST be processed before eating. Generally red oak acorns are not harvested for human consumption except during serious famine conditions. (Caution: Excessive amounts of tannic acid can lead to kidney failure. Therefore, if you must consume red oak acorns, you should process them for the maximum amount of time.)
There are several other varieties of oak trees, but the white oak is the most common oak tree throughout the United States, followed by the red oak.
If all the oak trees in your area are exactly the same, then they will all produce acorns that taste the same. But if you have different varieties of oaks, you will have different varieties of acorns which will taste different. Therefore, when you harvest your acorns, keep the ones you collect under each oak tree in a separate bag or container by themselves until you do a taste test to determine if any have a more agreeable taste than the others. If so, note which tree(s) they came from, and focus your next year's collection efforts there. You MUST harvest your acorns VERY soon after they fall to the ground or the squirrels, deer, and other wildlife will eat them. If the acorns stay on the ground very long, they will become infested with insect larva, and they will also absorb ground moisture and begin to mold.
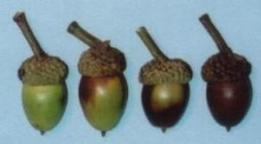
Collect your acorns every day from September through October as soon as possible after they have fallen off the oak tree onto the ground. They may be green, or green and tan, or brown. The green ones aren't fully ripe yet, but collect them also because they will ripen to a dark brown in a few more days. In my opinion, the green ones are better because they have just fallen off the tree and therefore they have had less time to absorb ground moisture or be attacked by insects. If you happen to notice that an acorn is defective when you pick it up, then toss it into the woods where there are no oak trees. Otherwise, there is a good chance you will be picking up that same acorn every day for many weeks to come.
After collecting all the acorns you can find each day, sit down and go through your new batch of acorns. Remove and discard the cap or crown of the acorn. Inspect the acorns (first inspection) and discard any that have an obvious defect, or signs of mold, or a tiny hole because it probably contains a worm. The acorns should feel firm between your fingers. Discard any that are soft.
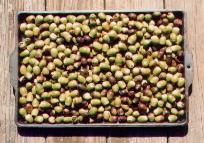 Spread the good acorns you collect each day onto a tray, board, or screen. You can then dry the acorns using any one of following three methods:
House Drying at Normal Room Temperatures: Allow the acorns to dry gradually inside your home at normal room temperatures. The acorns should only be one layer thick on the drying trays. If the acorns are relatively green, this drying method normally takes between two to four weeks.
The advantages of room temperature drying are:Sun Drying: Place the tray of acorns in direct sunlight for two to five consecutive days, depending on how "green" your acorns are when you collect them. Bring all your acorns inside each night. Drying in the sun is the traditional method. If the sky is partly cloudy or overcast, then you may need to dry your acorns for more than five days in the sun. (Note: If your acorns are not completely dry, they will soon be covered with mold and you will have to throw them away. Any acorns that are still partially green after a few days of drying should be separated from the rest of the acorns. Continue drying any partially green acorns until they turn completely brown.)
The advantages of sun drying are:Oven Drying: Place the tray of acorns in a warm oven (175şF) for about 20 minutes with the oven door slightly cracked to let the moisture escape.
The advantages of oven drying are:Of the above three different drying methods, I now prefer sun drying inside my home in front of a window that faces the sun.
After drying your acorns, inspect them again (second inspection). The drying process helps to reveal cracks or insect holes you couldn't see when the acorns were still damp. Discard any acorns that don't have a good exterior shell, or process and use those acorns immediately. Acorns with a cracked outer shell will dry out quickly on the inside, and the nutmeat will be lost.
It is also possible that small flying insects may have laid eggs inside some of your acorns while they were drying in the sun, if they could find a convenient entrance to the nutmeat area, such as a crack or hole or other imperfection. Those eggs will hatch in a short time and you will be able to identify the bad acorns when they do (they will have a small hole in them).
If you discover tiny holes in your acorns after they have dried, then discard the bad acorns and place the acorns without any holes on a cookie sheet and dry them in a warm oven at 175şF for 15 minutes with the oven door slightly cracked to let the moisture escape. The heat will kill any remaining insect larva inside the acorns.
Approximately one-week later, inspect your dried acorns for the third time and look for mold or worms or other major problems. Discard any acorns with mold (or process and use them immediately), or the mold will soon spread throughout your entire batch.
Approximately one-week later, inspect your dried acorns for the fourth time. Remove and discard any defective or moldy acorns (or process and use them immediately).
If you discover mold on your acorns at this point, then they were not thoroughly dry at the beginning. If the mold is not severe, then place the batch of acorns on a cookie sheet and dry them in a warm oven at 175şF for 15 minutes with the oven door slightly cracked to let the moisture escape and to kill the mold.
You may now store your thoroughly inspected, dried acorns in a cool, dry place until you need them. Store your acorns in several different containers. (Note: Ziplock freezer bags work extremely well for storing acorns.) If the acorns in one container become unusable, your other acorns should still be okay. Properly dried and stored, acorns still in their original shell will remain edible for several months.
As time passes, the inner acorn nutmeat gradually dries out and loses most of its flavor and it becomes too hard too chew. Therefore you should process and eat your acorns as soon as practical after collecting them. The longer they are stored, the more they will continue to dry out and become unfit for human consumption. Even under the best storage conditions at room temperature, most acorns will not be edible after six-months of storage.
If you have freezer storage space available, then you may remove the acorn nutmeats from their exterior shell and freeze only the nutmeats inside a ziplock freezer bag. This will help to preserve the moisture content of the nutmeats and significantly extend their shelf life and flavor.
Acorns must be processed before they can be used in acorn recipes.
Do NOT remove your acorn nutmeats from their protective outer shell until you are ready to process and eat them. The inner acorn nutmeat kernels will dry up and shrivel after a few days of exposure to the air.

At the top of the picture on the right there are several acorn nutmeat kernels after they have been removed from their shell.
At the bottom of the picture on the right there are several acorn nutmeats which have been split in half. The inner white nutmeat gradually darkens and begins to dry out the longer it is exposed to the air.
First crack the thin outer shell of the acorn. It will crack easily with an ordinary nut cracker, or pliers, or by squeezing firmly with your thumb and forefinger. Only crack the shell. Peel off the shell and save the inner nutmeat kernel for future processing. Sometimes you will split the inner acorn nutmeat in half as you crack the outer shell. That is okay. You may taste one acorn nutmeat kernel from each batch of acorns to determine if one of your local trees produces sweeter acorns than the other trees. After chewing and tasting, you should spit it out.
Our bodies are all different and we can not all eat the same foods as everyone else. For example, some people are allergic to milk and milk products. It is always a good idea to eat a very small amount of any new food that you have never eaten before to determine whether or not your body will have an adverse reaction to it. Therefore, if you have never eaten acorn nutmeats before, then you should only eat ONE and see how your body reacts. If you are allergic to other nuts, then you will probably not be able to eat acorn nutmeats. And you should NOT eat and swallow an acorn nutmeat until AFTER you have removed the tannic acid from the acorn nutmeats.
There are also two ways to process the acorn nutmeats:
If your original taste test of the raw unprocessed acorn nutmeats revealed little or no noticeable bitterness, then you may process your nutmeats as whole kernels. This preserves the appearance of the nut and it is useful because some recipes specify whole nuts. It also makes eating the nuts as a snack much easier.
If your original taste test of the raw unprocessed acorn nutmeats revealed an unpleasant degree of bitterness, then grinding the nutmeats is necessary because it allows the tannic acid to be removed with minimum boiling or flushing. Begin with whole acorn nutmeat kernels (without the cap and without the shell). Crush or grind the acorn nutmeats into smaller pieces or into a coarse meal using a hand grinder, or a flat rock, or a blender. If you use a blender, then add a little water to make a liquid mush.
Fill two pots with clean fresh water. Each pot should contain enough water to completely cover the acorn nutmeats (but don't add the nutmeats yet). Turn on the heat to the first pot of water. Taste one of the unprocessed nutmeats to determine the degree of bitterness it contains before boiling.
Note: Add pickling or canning salt to the final pot of boiling water before adding the nutmeats. The salt enhances the flavor of the nutmeats and it also increases their storage life.
Note: It is NOT uncommon for many white oak acorns to contain little or no noticeable bitterness. However, we are not all gifted with the same degree of sensitivity in our taste buds. What may taste pleasant to you may taste slightly bitter to someone else. And regardless of how they taste, all acorns contain some tannic acid. Therefore, you should boil all acorn nutmeats at least ONE time. But you may stop after one boiling if your original taste test revealed little or no bitterness in the original unprocessed acorn nutmeats. If you are only going to boil one time you will not need the second pot and you should add the salt to the first pot of boiling water BEFORE you add the nutmeats.
First Boil: When the first pot starts to boil, add the acorn nutmeats to the first pot of boiling water and immediately turn off the heat to the first pot. Turn on the heat to the second pot to start the water in the second pot boiling. Wait 30 minutes and the water in the first pot will be brown. Pour the acorns and the brown water through a strainer or coffee filter to separate the nutmeats from the brown water. (Note: Save the brown water from the first boiling for one of the uses suggested elsewhere in this summary.) (Note: If there was no noticeable bitterness to begin with and you are only using one boil, then skip down to the drying instructions below.) Taste one of the nutmeats. If the bitterness is almost gone then you will not need a third boiling and you should add the salt to the second pot of boiling water.
Second Boil: Put the nutmeats into the second pot of boiling water and immediately turn off the heat. Rinse the first pot and fill with fresh water for the third boiling. Wait 30 minutes. Strain the nutmeats from the brown water in the second pot. (Discard the brown water unless you want to keep it for another purpose.) Taste one nutmeat. If the bitterness is gone, then skip down to the drying instructions below. If the bitterness is almost gone, then add the salt to the third boiling. However, if the bitterness is still unpleasant, then wait until the fourth boiling to add the salt.
Third Boil: Follow instructions for second boil. Then taste one nutmeat. The original bitterness should be gone and it should have a sweet, nutlike flavor. (If the nutmeats should fail your taste test at this point, then boil a fourth time.)
Dry the nutmeats following the drying instructions below.
Note 1: If you switch the nutmeats from boiling water into cool water and then bring the water to a boil, you will lock in the bitterness and you won't be able to get it out.
Note 2: Do NOT let wet nutmeats sit for hours between boilings. The nutmeats will mold if you do.
Cold water flushing is only appropriate for acorns with little initial bitterness. Put the acorn nutmeats inside a clean pillowcase and leech in cold running water (faucet or stream) for several hours until the bitter taste is gone. Periodically squeeze as much water out of the pillowcase and acorn nutmeats as you can without damaging the nutmeats. Then continue rinsing. When the nutmeats no longer taste bitter, you can stop rinsing. Then dry the nutmeats following the drying instructions below.
If you need the damp acorn nutmeats in a bread recipe you may use them immediately without drying. However, if you are not going to use the nutmeats until later, you MUST dry them.
After removing the tannin using either boiling or flushing, spread the damp nutmeats in a thin layer on a baking tray and dry slowly in a warm oven (175şF to 200şF) with the door slightly cracked to let the moisture escape. Or place the tray of damp nutmeats in the sun near a window. (If you dry them outside in the sun, cover them with a clean screen or the wildlife will steal them.)
If you are drying ground nutmeats, the dried meal will be caked and it will need to be ground again.
If you are drying whole nutmeat kernels, you may eat them like nuts. Or use them in recipes that use whole nuts. Or you may process some of them into grits or meal on an as-needed basis.
Follow the tannin removal and drying instructions for acorn nutmeats above. Then pound or grind into course meal or grits. Acorn grits may be used in acorn recipes in place of chopped nuts.
Follow above Grits recipe but grind the acorns into a fine meal.
Store in a sealed, glass jar in a cool, dark place. They will keep for several weeks in the refrigerator or for several months in the freezer. Frozen nutmeats will retain their original flavor for about 10 months (or until the next crop of acorns is ready to be harvested). Because they contain nut oil, they will go rancid if left in a warm environment after they have been processed.
Caution: If stored for a very long time, smell them before using. If a musty smell is present, throw them away.
Save the brown water from the first boiling (discussed above). The brown water should be stored in the refrigerator. With the passage of time a mold will form on top of the water and you will need to boil the water again to kill the mold. Then refrigerate the water again until needed. The brown water may be used in any of the following ways:
Laundry Detergent: Two cups of the brown water can be used as laundry detergent for one load of clothes. Your clothes will smell very good but lighter colors (and whites) will take on a tan tint.
Traditional Herbal Home Remedies: The brown water has both antiseptic and antiviral properties.Hide Tanning: The brown water can be used in the process of animal hide tanning. Just soak the clean, scraped animal hides in the water. The reason the bitter ingredient in acorns is called "tannic acid" is because it was originally used to tan animal hides.
Acorn grits may be deep fried and eaten as a side dish.
Acorn grits may be added to soups or salads.
Acorn grits may be fried briefly in a skillet and then used as one of the ingredients in a granola snack recipe.
Acorn meal may be used in most recipes to replace 1/4 of the flour or 1/4 of the corn meal. However, since acorn meal contains natural sweetness, you should reduce any other sweeteners in the recipe by 1/4.
100% Acorn Bread will be hard if baked too long and crumbly if not baked long enough.
Ground acorn nutmeats may be roasted and then used as a weak coffee substitute.
| 2 cups acorn meal | 1/2 tsp. salt | 3/4 cup water |
| 2 cups acorn meal | 3/4 cup flour | 2 tsp. salt |
| 1/2 cup acorn meal | 1 pound lean meat, cut in thin strips | Several tortillas |
| 1 cup acorn meal | 1 cup flour | 1 tsp. salt |
| 3 tbsp. baking powder | 3 tbsp. oil | 1 cup milk (or water) |
| 1 cup acorn meal | 2.5 cups water | 1/8 cup hickory nuts or black walnuts, crushed |
| 1 tsp. salt | 1 tsp. honey or sugar |
| 1/2 cup acorn meal | 4 cups water |
| 1 cup corn meal | 1 tsp. salt |
| 2 cups acorn meal | 1/2 cup milk (or water) | 1 tbsp. baking powder |
| 2 cups wheat flour | 3 tbsp. butter or olive oil | 1 egg (optional) |
| Boiled dry whole acorn kernels | 2 cups sugar | 1/2 tsp. salt |
| 1/8 tsp. cream of tartar | 1 cup water |
| 2 cups wheat flour | 1 cup white (or brown) sugar | 1 tsp. baking powder (or baking soda) |
| 1 cup acorn grits | 1/2 cup shortening | 1 tsp. salt |
| Category | Amount | % RDV |
| Calories | 109.7 to 144.5 | 7 % |
| Calories from Fat | 60.9 to 80.3 | |
| Total Fat | 6.8 to 8.9 g | 14 % |
| Saturated Fat | 0.9 to 1.2 g | 45 % |
| Polyunsaturated Fat | 1.3 to 1.7 g | |
| Monounsaturated Fat | 4.3 to 5.7 g | |
| Cholesterol | 0.0 mg | 0 % |
| Total Carbohydrate | 11.5 to 15.2 g | 5 % |
| Protein | 1.7 to 2.3 g | 5 % |
| Vitamin A | 11.06 to 11.14 IU | Less 1% |
| B1, Thiamin | 0.03 to 0.042 mg | 3 % |
| B2, Riboflavin | 0.03 to 0.044 mg | 3 % |
| B3, Niacin | 0.52 to 0.68 mg | 3 % |
| B5, Pantothenic Acid | 0.20 to 0.27 mg | 3% |
| Vitamin B6 | 0.15 to 0.20 mg | 10% |
| Vitamin B12 | 0.0 mcg | 0 % |
| Vitamin C | 0.0 mcg | 0 % |
| Vitamin D | 0.0 mcg | 0 % |
| Vitamin E | 0.0 mcg | 0 % |
| Calcium, Ca | 11.62 to 15.34 mg | 2 % |
| Copper, Cu | 0.18 to 0.23 mg | 12 % |
| Iron, Fe | 0.22 to 0.29 mg | 2 % |
| Magnesium, Mg | 17.58 to 23.29 mg | 6 % |
| Manganese, Mn | 0.38 to 0.39 mg | 10 % |
| Phosphorus, P | 22.40 to 29.25 mg | 3 % |
| Potassium, K | 152.81 to 201.36 mg | 10% |
| Sodium, Na | 0.0 mg | 0 % |
| Zinc, Zn | 0.15 to 0.19 mg | 1 % |
| Alanine | 0.100 to 0.131 g |
| Arginine | 0.135 to 0.177 g |
| Aspartic Acid | 0.181 to 0.238 g |
| Cystine | 0.031 to 0.041 g |
| Glutamic Acid | 0.282 to 0.369 g |
| Glycine | 0.081 to 0.107 g |
| Histidine | 0.049 to 0.064 g |
| Isoleucine | 0.081 to 0.107 g |
| Leucine | 0.140 to 0.183 g |
| Lysine | 0.110 to 0.143 g |
| Methionine | 0.029 to 0.039 g |
| Phenylalanine | 0.077 to 0.101 g |
| Proline | 0.070 to 0.092 g |
| Serine | 0.075 to 0.098 g |
| Tryptophan | 0.021 to 0.028 g |
| Threonine | 0.067 to 0.089 g |
| Tyrosine | 0.053 to 0.070 g |
| Valine | 0.099 to 0.129 g |
| Ash | 0.386 to 0.506 mg |
| Folate, DFE | 24.66 to 32.66 mcg |